Monday, October 19, 2015

I'm in Love - again

It is amazing to me that capacitors sound so different. I have been swapping out non-polar electrolytic crossover caps for higher and higher quality kinds for several decades now each time believing that I have found the perfect combination. Moving from NPE to a mylar made the sound smoother but soft. Moving to a metal-film mad the sound crisper but thin. Moving to a wax made the sound clean but back to soft again.

Well folks, we have stumbled again into the realm of the unexplainable: the paper-in-oil capacitor. Musicians who actually listened to their music found that PIO caps made their gear sound much better. Tubes found their way back into guitar amps and keyboards and ever since musicians could access PIO capacitors, substitutions and modifications were made. To them the results were a more pleasing, more melodic, less irritating sound.

High-end gear sometimes uses PIO caps and other times a variety of other esoteric combinations. Rel Caps are favorites of Audio Research and Teflon caps commonly found as shunts for a variety of other metal-film brands. But the lowly PIO has found its way into more and more of my gear after a brief revelation as a shunt in the crossover network of my speakers.

While PIO caps are not the end, IMHO they are pretty close to perfection. But from which manufacturer would YOU choose? Mundorf? Angela? Amp-Ohm? Obbligato? Jensen? Deuland? I suspect that your funds would dictate your choice since the prices of these types of capacitors are extraordinarily high.

Consider the surplus market. For decades, the Russians produced spectacular capacitor products and the PIOs are no different. The series I lean toward is the K40Y-9. When used as tiny shunts (1/100th the value or less) across your existing signal-path capacitors, these little gems completely change the way they sound. And replacing them for a 1:1 value produces striking results.

So, if you want to make a huge change in your gear, try adding the 200V version of the K40Y-9 as a shunt to your crossover network's midrange LPF or your tweeter's HPF. If you are brave, hack into your preamp or amp and do the same for the input/output coupling caps. You just will not believe how spending a few dollars for 0.015uF caps (and waiting 30 days to get them) can transform your listening pleasure.

Yours for higher fidelity,

Philip Rastocny

I do not use ads in this blog to help support my efforts. If you like what you are reading, please remember to reciprocate by purchasing one of my eBooks or through a PayPal donation, My newest title is called Where, oh Where did the Star of Bethlehem Go? It’s an astronomer’s look at what this celestial object may have been, who the "Wise Men" were, and where they came from. Written in an investigative journalism style (like that of the Discovery Channel), it targets one star that has never been considered before and builds a solid case for its candidacy.

http://www.amazon.com/dp/B00QFIAC3G

My other titles include:


Copyright © 2015 by Philip Rastocny. All rights reserved.

The Path to a High-End System

You probably started out in your quest for the ultimate high-end system as an infant in your car-seat by listening to the stereo in your family car. One day, you got an MP3 player, probably in your cell phone. Swapping earbuds helped you to appreciate the quality or lack thereof in your player and one day you strolled into Best Buy (or a friend''s house or another big box store or a THX movie) and seriously listened to a good system. The lights came on: you heard something and found there is more art in music than a beat and words to a song!

Details never heard before began to appear and (possibly with the help of some medicinal ingredients) your appreciation for quality music took off. Soon, that MP3 player of old just didn't hack it anymore and it was time to get serious about tunes. With your driver's license came freedom and the opportunity to deck out your ride. Before long, thumps and tinkles captivated your commute to/from school or that job you got to help pay for that amp.

Down the road, probably after your second or third REAL job (flipping burgers doesn't count), you decided to take the plunge and get a decent system for your digs. A simple receiver, possibly multi-channel surround, showed up next to the Samsung TV and entertainment bliss was on its way.

This lasted for a while and then things started to sound not quite right or just a little off. Your ears matured and you began to listen to the decays and silence between the notes. "Mr. Scott...we need more power...NOW!" or something like that ran through your mind. Off to the new audio salon in town; time to spend some serious bucks.

Ever since that day, things have moved in and out of your listening room. Speaker sizes grew, you discovered that cables and wires do make a difference, and CDs just sounded a bit off. That old receiver found its way into your office (or garage) and separate components lined the shelves. Esoteric DACs and high-res software showed up as if by magic on your desktop and you were off to the digital races.

But then, on a chance meeting, you heard an old analog system. Something else came from the speakers you never heard before. What you thought was audio nirvana was now reformed. Tubes, vinyl, and turntables may have crept their way into your rig as did your constant comparison between the two sources. One was more convenient but one was more real. Quite the dilemma.

And then came along DSDs and higher quality recording techniques. The difference between old school and new narrowed and you may have questioned whether old school was worth keeping. But you were too busy moving your speakers around and adding acoustic treatment to the room to seriously consider selling your turntable

But regardless of your choice, new gear rolled in and out of your system and the evolution continued. Some diverged into the DIY realm and others found happiness in off-the-shelf gear or hiring folks to do upgrades. Power conditioners, equipment footings, speaker spikes, and other accessories each contributed to that tiny improvement that pushed forward the state-of-the-art.

Today, you are happy, at least until you hear your friend's system or something blows up. And then the search for that next step in upward spiraling audio nirvana continues including your never-ending expansion to your software library.

Such is our hobby and so is our happiness. Eventually a balance is struck between funds allocated to your rig and your other monthly bills, but that piece of the pie dedicated to your hobby never really gets completely cut from your budget. Your dreams of a better system and your enjoyment of just listening to a good performance never changes, NEVER. Even when life demands your attention in other directions, you find yourself still enjoying the magic and mystery of you ears.

The path to a high-end system is a long one, one that never ends. Sometimes it takes a while for technology to become affordable and other times you just settle for "good enough." But deep down inside, you hear that old refrain from your first venture into the audio void, "Mr. Scott...we need more power...NOW!"

Yours for higher fidelity,

Philip Rastocny

I do not use ads in this blog to help support my efforts. If you like what you are reading, please remember to reciprocate by purchasing one of my eBooks or through a PayPal donation, My newest title is called Where, oh Where did the Star of Bethlehem Go? It’s an astronomer’s look at what this celestial object may have been, who the "Wise Men" were, and where they came from. Written in an investigative journalism style (like that of the Discovery Channel), it targets one star that has never been considered before and builds a solid case for its candidacy.

http://www.amazon.com/dp/B00QFIAC3G

My other titles include:


Copyright © 2015 by Philip Rastocny. All rights reserved.

Tuesday, September 8, 2015

Another OPPO Mod

My OPPO BDP-105 has undergone several major transformations since its original purchase. What started out as a fine sounding streaming player right out of the box has been upgraded to a true high-end streaming media device through careful attention to proper modifications. Many articles appear on the web regarding tweaks, upgrades, and hints on "how to DIY" fixes for such a stellar product and this blog is no different.

After reading about what others have tried, I used what they suggested in combination with what I already knew "worked " and came up with a series of modifications that made my ears rejoice. It takes a while as you push your system to musical nirvana but with each change you climb one more rung up the long, long ladder.

The latest discovery is a paper-in-oil capacitor, nothing new to the universe but new to me. Finding the right combination of equipment, cables, line filtering, and capacitors to resemble reality is what this hobby is all about but when it all comes together, you get that magic that transforms your listening pleasure from something that sounds great into something that sounds real. You hear the details the reviewers write about coming from your own speakers and you understand that they are anything but crazy. Even lowly MP3s sound decent but when compared to a SOTA DSD, you understand why some accomplished musicians are seeking higher and higher resolution for their recordings. It's that obvious.

I recently considered removing the DC-blocking capacitors from the final analog output stage of my BDP-105 but after further consideration I decided against it. If I ever took my OPPO to someone's home, it would have to accommodate a possible DC offset from the OPPO (read DC blocking capacitor input of their preamp). So I went off to work figuring out how to safely shunt the stock capacitors. To start, one must be certain which capacitors one needs to shunt. Below is the audio schematic for the BDP-105 (note CE93 and CE94 are the 100uF/16V DC-blocking capacitors).


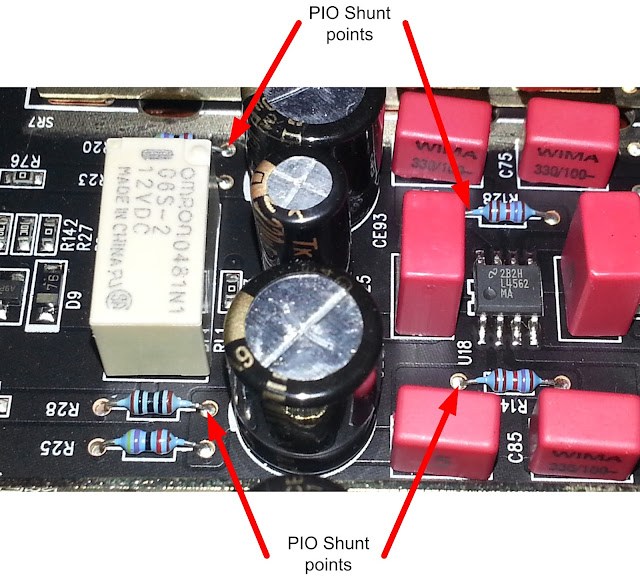
Others have used shunt capacitors from the underside of the PC board but the PIO capacitors I chose are quite large (about 3/4" in diameter) and will not fit. The task was to figure out where to add wires to the ends of the readily-accessible resistor leads to accomplish the same results as soldering them to the underside. Note from the above schematic that R128/R140 connect to one end of this capacitor. Resistors R23/R28 (or R25/R20) connect to the other end. Below is a highly magnified view of the output stage showing where these resistors are located from the top of the PC board. The red arrows show which resistor ends are used and the rear of the chassis is on the left.


The Mod

The first thing I did was to insulate the metal body of the PIO capacitor by putting heat-shrink tubing around it (for obvious reasons). Fortunately I had some large tubing left over from a tonearm modification I performed a while back and after a few minutes these capacitor grew in diameter to just over 3/4".

The next step is to remove and replace the stock ferrous-alloy leads of the capacitor. These leads are soldered to the end terminal of the capacitor; heating the wire and removing it is not recommended since it may damage the capacitor. But cutting the wire short off at the terminal eliminates the two inches of ferrous alloy and provides a point where the new wires can be attached. I chose to use new wires made from two twisted strands of #26AWG Teflon-insulated silver-plated OFHC wire-wrap wire.

Now comes the tricky part: connecting these new wires to the resistor leads. In concept, this should be a "no-brainer" to the average DIY tweaker but the component density on the OPPO is quite high making it necessary to use a fine-point tip and very low heat on the soldering iron. In reality, soldering the wire-wrap wires to these resistors takes a lot of patience to get a good solder joint without destroying surrounding components, lifting the trace off of the PC board, or disrupting the integrity of other existing connections. In other words, this mod is not for the inexperienced or faint of heart. Feeding the wires under the resistor lead provides the best electrical+mechanical connection but I found this to be impossible without lifting the resistor out of place. So the next best solution is to make a non-mechanical connection (just tack the wire to the side of the resistor lead). This "works" but it is not a truly professional solution. If I had used just one #26AWG wire, I could have fed that wire under the resistor lead (hind sight is always 20/20).

Finally, I attached the free-floating capacitor to some surrounding electrolytics with a few dabs of hot glue and the mod is done.

The Sound

Frankly, this is initially a subtle mod that requires some patience to appreciate. What to listen for is the fullness of the strings in a guitar body and the inner detailing of its harmonics. A good piece to use as a before/after test is  Nils Lofgren's "Kieth Don't Go" on his 2006 Acoustic Live album. Although only a 16/44 recording, it clearly provides evidence to the fruits of your efforts. Listen to the timbre and color of the lower strings as Nils artistically plucks them. Listen to the inner detail of the guitar body in response to how hard the string is plucked and where/when he rests his palm on the body to contour/alter its sound. This is the region I noticed most of the changes to occur.


My wife, a movie fan, even commented on how dramatic and forceful the sound now emanates from the system. Historically, asking her if she notices a change in the sound after a modification yields a simple response "It sounds great!" which loosely translated means she likes it but cannot articulate why. This time she was able to fit words into her perception and the results is another successful modification.

The capacitors took a mere 10 hours to break in and the sound is now so sweet and mellow that one may easily compare it to that of a good tube. You will notice a definite change, one that is very easy to get used to. Instruments that may once have been "strained" are now more accurately reproduced fully. Saxophones have that unique round "bell" sound that one hears in a live performance but rarely finds in a home stereo system. Sounds once blurred appear cleaner and vocals, well just listen and you will not be disappointed.

See also http://audiophile-musings.blogspot.com/2014/09/an-easy-oppo-bdp-105-modification.html
for another great idea on upgrading your OPPO.

Yours for higher fidelity,

Philip Rastocny

I do not use ads in this blog to help support my efforts. If you like what you are reading, please remember to reciprocate by purchasing one of my eBooks or through a PayPal donation, My newest title is called Where, oh Where did the Star of Bethlehem Go? It’s an astronomer’s look at what this celestial object may have been, who the "Wise Men" were, and where they came from. Written in an investigative journalism style (like that of the Discovery Channel), it targets one star that has never been considered before and builds a solid case for its candidacy.

http://www.amazon.com/dp/B00QFIAC3G

My other titles include:


Copyright © 2015 by Philip Rastocny. All rights reserved.

Sunday, August 23, 2015

Mu-metal Part 3

In Parts 1 and 2 of this 3-part series, I found a new friend: mu-metal. It worked wonders in my line conditioner so I thought I might give it a go in my low-level equipment. In Part 2 I applied the same chassis shielding technique to my OPPO BDP-105 with the same positive results. In this part, we'll look at how (if?) further shielding in the OPPO would benefit and then apply that treatment to my Onkyo P-3000R preamp.

Tearing down the OPPO is getting to be a routine; I've done it now 10 or 11 times for various reasons but I was excited about adding mu-metal to the switching power supply (SPS) section. Reading how nasty this supply is made me believe that there were more issues with SPS than just the high-frequency band smearing associated with their inherent design. And I had a surprise when pulling off the cover of the SPS: mu-metal on the inside. At least two sides of the supply were already shielded so now the side between the supply and the remaining electronics needed to be shielded.

So the first thing I did was to remove the rail and coat it with mu-metal. Instead of carpet tape, I used a spray contact cement on both the cut-to-fit mu-metal pieces and the bracket.


Next, I wrapped a band of mu-metal around both transformers and used a cable tie to hole it in place (yes, I wrapped the already shielded toroid too). WARNING: Make sure that the mu-metal is properly insulated so that it does not short out the wires on the transformer! Remember the edges of this metal is sharp and it will easily cut through any insulation these wires may have.


The next step is to make "hats" for the tops of the transformers and then use another cable tie to hold the hat in place.

While the cover was off, I also added a 0.01uF/200v shunt capacitor to the fuse. Doing this takes care of any thermal non-linearities in the resistance of the fusing element.


Put it back together and all should be well.


First, I want to say that the P-3000R is an under-rated preamp and with a few minor tweaks brings it up to truly high-end quality (change those Full-Wave Bridges to four discrete FRED diodes [2 FWB = 8 FRED diodes] and see for yourself!). So I was happy with the way the preamp sounded with these mods, but hey, what do I have to lose but a little time and maybe a band-aid for the nasty paper cuts on the edges of the mu-metal?

So I first performed the same chassis wrapping as with the OPPO.


And then I did the same transformer wrapping.


Button it up, plug it in, and turn it on. Be prepared to be amazed.

What I noticed was even more low-level grunge removed (I had no idea that it was there). The inner detailing is now a quantum level better than before and I am not exaggerating one bit. The instruments show more nuances than I suspected were captured by the recording process. It is in a word breathtaking.

Now you must realize that your system is a chain and the weakest link limits how much you will observe on yours as compared to mine. Know that all of my gear is seriously tweaked and the attention to detail is unsurpassed. But as you make these changes in your own system, each thing you do you will eventually hear even if the changes are not as obvious. You just have to identify what in the chain is the limiting issue and once it is resolved everything can come alive.

So grab your scissors and glue, buy some mu-metal off eBay, and shield!

Yours for higher fidelity,

Philip Rastocny

I do not use ads in this blog to help support my efforts. If you like what you are reading, please remember to reciprocate by purchasing one of my eBooks or through a PayPal donation, My newest title is called Where, oh Where did the Star of Bethlehem Go? It’s an astronomer’s look at what this celestial object may have been, who the "Wise Men" were, and where they came from. Written in an investigative journalism style (like that of the Discovery Channel), it targets one star that has never been considered before and builds a solid case for its candidacy.

http://www.amazon.com/dp/B00QFIAC3G

My other titles include:


Copyright © 2015 by Philip Rastocny. All rights reserved.


Saturday, August 22, 2015

Mu-metal Part 2

In Part 1 of this 3-part series, I found a new friend: mu-metal. It worked wonders in my line conditioner so I thought I might give it a go in my low-level equipment.

I tried the same cabinet-coating approach I did with the line conditioner in my OPPO BDP-105. I took off the rubber feet, cut out a piece to fit on the bottom, used carpet tape to hold it in place, and then put the feet back on through x-shaped holes I made with an XACTO knife. I also cut a vent hole under the power supply to allow airflow for proper cooling.


I pulled off the cover and coated the three interior surfaces in a similar way (carpet tape & cooling hole).


Note that the holes are much smaller than the originals but the unit does not get any hotter than it did before.

Put it back together and you have a pretty well shielded chassis without a lot of work.

So the surprise is in the sound. This unit has a nicely isolated toroid power transformer so I did not wrap this transformer. But the results were almost as amazing as with the line conditioner in Part 1. The noise floor drops and inner details come alive. If you have ever listened to a preamp with an outboard power supply, this mod has a similar effect. You just won't believe your ears (sort of like hearing a high-quality paper-in-oil capacitor for the first time - you just never forget it).


Mumetal is a thing of beauty and it is not that expensive. The trick is to cut it with a scissors and not a saw or shears. Wrap it in circles or bend it once (rebending, while possible, is not really a good option). It does leave VERY sharp edges so you also must be careful not to get a steroid-sized paper cuts when handling this stuff. Just be careful and try this yourself. Wrap those power transformers and box up those low-level signal components and be prepared for a shock.
So if my power conditioner and OPPO BDP-105 responded, what about my preamp? See part 3 to find out.

Yours for higher fidelity,

Philip Rastocny

I do not use ads in this blog to help support my efforts. If you like what you are reading, please remember to reciprocate by purchasing one of my eBooks or through a PayPal donation, My newest title is called Where, oh Where did the Star of Bethlehem Go? It’s an astronomer’s look at what this celestial object may have been, who the "Wise Men" were, and where they came from. Written in an investigative journalism style (like that of the Discovery Channel), it targets one star that has never been considered before and builds a solid case for its candidacy.

http://www.amazon.com/dp/B00QFIAC3G

My other titles include:


Copyright © 2015 by Philip Rastocny. All rights reserved.

Mu-Metal Part 1

After hearing the amazing differences the BPT power conditioner made in my friend's system (see my review here), I decided to take a good look at the design of my own power conditioner to see if anything could be done to emulate the performance of this fine piece of equipment. I have been using a PowerVar ABC-1200-11 that I already modified installing a 20A toroid common-mode noise-rejection choke on the primary side and some additional secondary filtering. The unit - I thought - was built well and I had already removed the ground loops on both the transformer and the outlets.

But the BPT took power conditioning up another notch and I suspected that the shielding of the chassis and transformer is where the differences hid. So I pulled out some old mu-metal I had lying in a dusty corner, a scissors, and some carpet tape and went to work. I first removed the cover and coated all interior surfaces (3 pieces cut to size and taped in place). Next, I removed the feet and taped a piece on the bottom of the chassis (outside, not inside). I did not reinstall the stiff rubber feet but instead used four pieces of heavy foam to "float" the chassis (this took a stiff pad, one I trimmed from a piece used to keep my knees from getting sore while gardening). These pads were made of different sizes based on the weight they had to hold up (larger=heavier corner). Another piece of carpet tape kept them firmly in place.

Finally, I removed the large toroid transformer from the case and wrapped it first in plastic tape and then covered as much of the transformer in mu-metal as I could (below, above, and a circular strip wrapped all around). I had already replaced the power cord with a shielded #10 3-wire cable so all that was left was to plug it in and turn it on.

OMG! All of the low-level grunge disappeared. It was as if Dyson invented a new vacuum on electronic steroids and it had come to the rescue to clean up AC power. All of the background noise dropped to threshold levels I did not believe possible. The effect was so dramatic that I suspected I was trying to hear things that were not really there. You know how it goes when you get a new car and suddenly that becomes the best and only car you see on the road? It's called a scotoma (a naturally-occurring blind spot) and it means that your eye doesn't see everything you believe it does. Putting it another way, it only sees what it wants to see and ignores all else.

Well the same sort of scotoma occurs in audio to your ears when you get a new piece of gear. It suddenly becomes that magical piece of equipment that bumps the level of your system up a full order of magnitude toward recreating reality BUT in truth it does not. To understand if you are hitting an audio scotoma, you must abandon your ego and any psychological investment you may have to its addition. You just get honest with yourself and become an observer rather than someone with a vested interest. Easily said; not easily done. Here's a side story to help you understand how your emotions can influence your ears (here your eyes).

A friend of mine bought a 4K television and loved the way it looked. He was amazed at the additional clarity and revelation of subtle detail but ignored color (in)accuracy. When I came into the room, I had a totally different experience than what my friend had immediately reaching for the calibration discs instead of watching a golf game on fluorescent green grass. Well, long story short, after tweaking the color closer to the real thing, he decided that he preferred the color the way the manufacturer set it up initially (yikes!). So much for realism.

This true tale can also be relevant for your perceptions about audio. You may initially be thrilled at a change in your system but those tiny filters in your head regarding the money you invested. If you know how much something costs, you immediately attach an expectation to what you SHOULD hear. After all, a $10,000 Audio Research preamp should sound better than a $200 Pioneer preamp, right? Maybe yes; maybe no. But the point is to remove these expectations and evaluate the truth. BTW, the same type of peer-pressure scotoma occurs when a so-called "expert" makes derogatory remarks about your system that are unsubstantiated.

Was I hitting a scotoma when listening to the effects of the mu-metal on my system? I considered this at first trying desperately to NOT hear a change and then to NOT hear an improvement. Alas, this was a truly futile  effort. The changes were both unmistakable and undeniable. I heard more from my system than I ever thought possible. The PowerVAR conditioner only did a partial job at cleaning up the noise coming into my system (sources of this noise were both INTERNAL - of my own doing like refrigerators, motors, etc. - and EXTERNAL - not of my own doing like nearby strip malls, factories, neighbor's workshops, etc.).

Mumetal is a thing of beauty and it is not that expensive. The trick is to cut it with a scissors and not a saw or shears. Wrap it in circles or bend it once (rebending, while possible, is not really a good option). It does leave VERY sharp edges so you also must be careful not to get a steroid-sized paper cuts when handling this stuff. Just be careful and try this yourself. Wrap those power transformers and box up those low-level signal components and be prepared for a shock.

So if my power conditioner responded, what about my preamp? And what about my OPPO BDP-105? See part 2 and part 3 to find out.

Yours for higher fidelity,

Philip Rastocny

I do not use ads in this blog to help support my efforts. If you like what you are reading, please remember to reciprocate by purchasing one of my eBooks or through a PayPal donation, My newest title is called Where, oh Where did the Star of Bethlehem Go? It’s an astronomer’s look at what this celestial object may have been, who the "Wise Men" were, and where they came from. Written in an investigative journalism style (like that of the Discovery Channel), it targets one star that has never been considered before and builds a solid case for its candidacy.

http://www.amazon.com/dp/B00QFIAC3G

My other titles include:


Copyright © 2015 by Philip Rastocny. All rights reserved.

Wednesday, July 8, 2015

Balanced Power Technologies BP-10.5 Signature Plus Power Conditioner Review


I purchased an Onkyo Integra series P-303 preamplifier way back in the 1980s. It came with a beautiful wood cabinet and looked great from the outside. But inside is where the real beauty hid: it came fully shielded with an anti-magnetic material called Mu-metal. Mu-metal (aka mumetal) is used primarily shield against low-intensity magnetic fields where the highest attenuation, highest initial permeability µ (Mu) and highest shielding efficiency are desired. Low-level audio signals such as those found in pre-amplifiers and low-output moving-coil phono cartridge (pre-pre) amplifiers are a perfect places for the application of this technology. Seeing it in the P-303 reassured me that engineers - when given the proper budget and license - would apply appropriate high-technology to a design.
Onkyo Integra P-303 and Internal Mu-Metal Shielding, Circa 1982
Then to change things up in the application of such technology, I went to a friend's home who had just purchased a entirely new system top-to-bottom and needed some help setting it up. One of the things I noticed was a mammoth power conditioner by a company called Balanced Power Technologies (aka BPT) with which I was unfamiliar. My friend's model is a BP-10.5 Signature Plus (MSRP $3,000-$3,400 depending upon configuration, his being the upper end). Seeing the visually stunning craftsmanship was one thing but lifting this very heavy (75+ pound) piece of gear was quite another. It is basically a high-quality 20-amp toroid transformer with pre/post-filtering using hospital-grade outlets.

Blah, blah, blah. These are features many other power conditioner manufacturers have already; no surprises here in the choices of fundamental building blocks. But there was something different about this particular conditioner that made the music come alive.

BPT Power Conditioner
With permission from my friend, I took off the cover to see what was inside. Yup! There they were, the usual suspects. But there was more...much more.

Cover Off - Stunning Transformer
The Design

Fascinated by the size of the huge toroid transformer, I initially overlooked something: the prolific use of the Stillpoints ERS stealth cloth lining the chassis and most of the components. I knew how much a 20-amp 120V low-leakage isolation transformer costs so I was initially impressed by its appearance inside of this unit, so much so that I initially ignored the gray cloth. With this cloth appearing almost everywhere, it gave the unit a really "clean" appearance matching the class engraved front panel.

Continuing with the inspection, one can see the care taken to carefully solder a solid-silver hot, neutral, and ground bus to the four 20A hospital-grade outlets and the one 20A GFI outlet. With the presence of a GFI outlet, this toroid is most certainly a balanced output secondary (60V-CT-60V) as opposed to what I originally anticipated it to be, a more conventional single-ended (autoformer or 120V-neutral) transformer design (a definite step up here). Previous models used a custom designed Plitron low-noise narrow-bandwidth toroid and I suspect that this unit is no different, possibly even an improved version. Standard RF capacitor filtering is used at each outlet and the values concealed behind heat-shrink tubing. Again notice the abundant presence of the Stillpoints cloth on the outlets. Previous models used this cloth liberally applied on the outside of these capacitors and the heat-shrink tubing now holds this cloth securely in place.

Solid Silver Electrical Bus and RF Suppression Capacitors
Turning my attention to the left side of the unit, there were two very interesting "cans" installed in series with the primary leads (input connections) to the transformer. Normally, this would be the place to use differential-connected RF chokes but the heat-shrink tubing made it impossible to see what parts were used at this point. Previous designs used large ferrite loops and I suspect that this unit uses the same approach and the heat-shrink tubing holds more of the Stillpoints ERS cloth around them.

Differential-mode Filtering
 The top of the unit also uses this Stillpoints ERS cloth everywhere making essentially a Faraday Cage around all of the internal components. Clever and vaguely reminiscent of the Onkyo approach with Mu-metal (you knew I'd tie things up eventually if you were just patient)!

BPT Cover Treatment
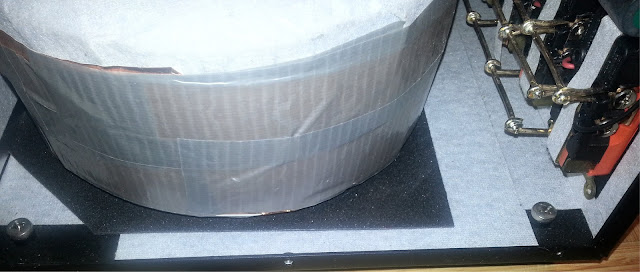
All in all, designer Chris Hoff has nicely implemented and well thought out this ever-evolving technology. But then I noticed one last detail: a copper band around the transformer.

Copper Band Around the Transformer
You can see a tiny bit of the copper band protrude above the white tape at the top left of the above image. Wrapping such a band around any transformer helps isolate any currents from straying in/out of the windings. Again, this lowers noise and creates cleaner power to your equipment. Kudos! BTW, a nice piece of mechanical vibration damping material can also be seen on which this transformer rests.

One last item not to overlook is the RF/surge capacitor used at the switch.

RF/Surge Capacitor
1.0uF/250VAC Surge Capacitor
The Sound

With this much attention to detail, it should sound really good, right? In a word, YES! An emphatic and unreserved YES! Like a vacuum cleaner, this unit removes the "grunge" from the noise floor in all of your gear and improves overall dynamics. Digital sources sounded less edgy and video sources were hugely more three-dimensional. My friend's old power conditioner just didn't permit any of the potential his electronics and video systems to shine through. In my friend's own words, "I can listen to this system now for prolonged periods of time where before it became fatiguing to me after about 30 minutes..."

Yes, listening to streaming digital for prolonged timeframes can be fatiguing to a sensitive ear but this power conditioner helps resolve some of this problem. While my friend's system developed issues with the music server (a stuck CD in the drive) and I was unable to thoroughly evaluate this power conditioner's full potential, I can say that for the few hours we spent with it, I was impressed. Swapping out power cords to his preamp from various manufacturers easily revealed differences between them, something most people find difficult or even impossible to discern. I suspect that the weak link in the chain in this case is inadequate power conditioning and not the proverbial "snake oil."

The Bottom Line

Is it worth the money? IMHO, without a doubt. I have found that cleaning up noisy power issues can have as big an effect on your system as changing the speakers. If you live near the end of an electrical service corridor as I do, far from the substation, your electricity is about as "dirty" as it can get. Everything switching on-off, every motor running, every computer power supply between you and the substation appears on YOUR outlets and this noise is cumulative.

Filtering noise out with modest design approaches just isn't worth the money since to do so properly takes a multi-tiered technique such as the ones used by BPT. Attenuating surge is a whole different ballgame than eliminating noise but surge suppression is what most people focus on - and incorrectly I may add. Protecting your gear is important, enough said. But providing clean power is not the same thing and surge protection does little or nothing to improve the sound of your system.

I have found that when spending thousands on a preamp, if you do not spend thousands on proper power conditioning, you have literally wasted your money on that preamp. It's sort of like running watered-down low-octane gasoline in a top-fuel dragster: it just doesn't make sense (GIGO and the "weakest link in the chain" principles apply here).

So if you are ready to step up to higher fidelity, give the BPT a spin. I believe they still offer a 30-day money-back return policy so these folks are pretty sure you will be impressed by their work. I'm suspect that it will find a place in your evolving system.

Contact Information:

Balanced Power Technologies
708 Wheatfield Ridge Ct.
Defiance, MO 63341
Phone: (314) 265-1095
E-mail: contact@b-p-t.com
Website: www.b-p-t.com


Yours for higher fidelity,

Philip Rastocny

I do not use ads in this blog to help support my efforts. If you like what you are reading, please remember to reciprocate by purchasing one of my eBooks or through a PayPal donation, My newest title is called Where, oh Where did the Star of Bethlehem Go? It’s an astronomer’s look at what this celestial object may have been, who the "Wise Men" were, and where they came from. Written in an investigative journalism style (like that of the Discovery Channel), it targets one star that has never been considered before and builds a solid case for its candidacy.

http://www.amazon.com/dp/B00QFIAC3G

My other titles include:


Copyright © 2015 by Philip Rastocny. All rights reserved.

Tuesday, June 23, 2015

Streaming Audio from my OPPO

While many of my components offer wireless connections, I prefer to hardwire them and only use wireless connections for our cell-phone data. So in 2010, I plumbed my home with Cat-5e Ethernet cable running dedicated lines in my (tiny) crawl space to my home stereo/theater, NAS, printer, a micro-cell tower, and three dedicated outlets for PC use. While the streaming music through my OPPO from the remotely-located NAS sounded good, I had a burning gut feeling that I needed to shield the Ethernet cable. But for the time, this was state-of-the-art and it worked.

As standards evolve and time goes on, Ethernet cables got faster and faster, and presently some even offer exotic shielding. Below is a table comparing past, current, and future technologies and associated bandwidths.


Today, shielded Cat-7 Ethernet cable is readily available touting individually-shielded pairs, overall shielding, and speeds a mere 6x faster than my old unshielded CAT-5e cables. This rekindled my gut feeling; it kept gnawing on me to stop procrastinating and upgrade the wiring. So being the one to easily hear differences in interconnect cables and proving that there are differences in HDMI cables, my logical mind suspected that there may be losses in my LAN that upgrading the cables may help eliminate. It now became a dual-motive for this rewire and I no longer had any justification to procrastinate further.

But first, a bit of history about the evolution of my home LAN since it has grown leaps and bounds in complexity since 2010.

In the beginning...

I started out with a 1Gb cable modem and one hard-wired run to my FAX/printer; my single-band 10/100 wireless router made connections to everything else. 
My First Home Network

But as my home-network components changed and cell-phone data rates improved, I moved to a dual-band wireless router still with no dedicated lines. I admit that I was lazy and didn't want to take the time to crawl under the house and run wiring to it all. After all, that's why wireless was invented, right?

Adding more wireless devices at various distances from the router soon began to show that the signal became unreliable the further from the router they were. So a Linksys EA4500 wireless router with dual bands, higher power, and four gigabit ports replaced it and I moved to another location under a cabinet in the kitchen (a non-lazy solution, BTW). This relocation got the wireless router as close (and centrally-located) as possible.

Second Home Network
But then I bought an OPPO BDP-105 and a 2Tb NAS (1Tb in RAID-2) and started streaming digital music into my system. I ran dedicated Cat-5e connections to both of these devices and that "worked" well but I noticed that there was only one free port left on the router.
Third Home Network
And so it grows...

The wireless connection to the Smart TV was only used for firmware updates and built-in TV apps; I streamed Netflix video from the OPPO and routed the video to the TV via an HDMI cable. It all "worked" but then came the addition of a DirecTV set-top box and I ran out of hard-wired ports. So taking the lazy approach, I opted for a 10/100 hub at the home theater location. Since I had a hard-wired hub port available, I also chose to connect it to the hub.
Fourth Home Network
Data reception in the house was good for the smart phones but calls were next to impossible. So I added a wireless access point (AT&T calls this their mini-cell tower). I also bumped my internet bandwidth subscription from 1Mb to 10Mb and all was well for the connected equipment (both wired and wireless).

With this growing complexity, I decided it was time to start looking at its overall configuration. Besides, with all of these new devices, I ran out of ports. It was time to make some hard choices: I opted to go with the lazy approach again and just add a Linksys SE2800 8-port gigabit switch at the modem. The logic was to keep local network traffic isolated from the wireless traffic thereby sharing the load. This would also grow my available hard-wired ports from 4 to 7 and that is all I needed at the time.

To also remove what I suspected to be a potential bottleneck, I upgraded to a D-Link 4-port gigabit hub at the home theater "just in case." While it did reduce dropouts with streaming video, it did nothing to improve the sound of my streaming audio (still with the Cat-5e cables remember).

Fifth Home Network
But NOW...

I changed network access for our PCs from wireless to hard-wired connections thereby off-loading some of the router's work. Hard-wired connections to the PCs greatly improved internet speeds and relocating the cable modem, router, and NAS to the Lanai made maintenance much easier (it was always a pain to crawl into the kitchen cabinet to reboot the cable modem or the old NAS).

The last growth spurt added solar panels and a new 4Tb NAS (3Tb in RAID-5). A gift of 0.5Tb of high-resolution files from a good friend entered the picture last month and I now stream a lot of DSD/DSF/DFF files through my stereo.

Sixth Home Network
While I am still subscribed to 10Mb bandwidth, traffic on my LAN is considerably heavier (I am not a video gamer). This again got me thinking about the old Cat-5e wiring. So this week, I started upgrading the LAN cables to Cat-7 shielded starting with the connections between the NAS and the home theater. A modest investment of less than $200 did everything.

Rewiring took about three hours with the usual "I forgot the drill" and "where did I leave the screwdriver" delays but I wrapped it up about 5:45PM yesterday evening. I only have the three PC runs left to accomplish and I will do that sometime next week.

Lanai Equipment Concealed Behind a Loveseat
What did we hear?

This was one of those changes that hits you over the head; it was that obvious. While the musicality and tonal balance remained relatively unchanged, two things immediately surfaced: 1) the noise floor is much better, and 2) the ambience is superb. It sort of goes without saying that these two are directly related and if you get one you can assume you will also get the other, but again you know what people say about assumptions. For example, in Eva Cassidy's "Fields of Gold" on the Live at Blues Alley you can more easily hear the technique used by the guitarist as he plucks the strings. The resonances in the guitar body and strings take on more realism and echoes trail off into the far corners of the room. Not bad for a Red Book recording.

Switching to high-res, the inner detailing of the cymbal work in the 24-192 recording of "Alright, OK, You Win" by Louise Rogers on Audiogon's 24/192 "Wake Up Your Ears Sampler" is just amazing. What was once nicely articulated is now even better (this is the main reason I love this hobby). Plus, the depth of the soundstage increased! It's nice to hear echoes in the back corners of the studio on a digital recording that once you could only hear on vinyl.

And with a good DSD recording, things get even better. You begin to appreciate why these recordings cost so much ($30 for an album appears a little steep) but comparing it to the cost of a car, music is still a bargain. REALITY CHECK: When I bought my first new car (a 1970 Duster 340) I paid about $1,800 for it and later that week I bought a record album for about $3. The ratio (10x for an equivalent car today) is about the same and it is our perception of the price that has changed.

Ambience and reverberation times on DSD recordings are what I noticed the most where sounds that once "died" could be heard lingering longer in the approaching noise floor. The dynamic range and corresponding low-level noise just got better.

The gap between high-res digital and analog is getting smaller folks!

The Bottom Line...

It's easy to get complacent when things are going well; it's harder to admit that there may still be room for improvement. Laziness and procrastination may have its place, e.g. to try a new idea out so as to keep an investment low (a test). A lazy approach to an upgrade may even get you say 80% of the way to its full potential. But to squeeze that last 20% out of an upgrade, you must admit to yourself that you are being lazy and get over your possession with (addiction to?)  procrastination.

BTW, if you are using a USB-connected server to your DAC, the only improvement you will notice is in transfer speeds. That is, when adding downloaded software purchases from your PC to your server, it will take less time to do so. Otherwise, the sound for such systems remains unchanged.

Should I Rewire?

My advice if you stream music as I do from an Ethernet-connected server: abandon wireless, toss the old cables, and rewire with Cat-7. The changes are obvious and economical plus your internet speeds improve: two birds with one stone. Anything this simple and economical to do should be done. If you haven't gotten off of wireless, stop procrastinating and admit to yourself that you're just lazy. Get over it! As Nike says, "Just do it!"

Yours for higher fidelity,

Philip Rastocny

I do not use ads in this blog to help support my efforts. If you like what you are reading, please remember to reciprocate by purchasing one of my eBooks or through a PayPal donation, My newest title is called Where, oh Where did the Star of Bethlehem Go? It’s an astronomer’s look at what this celestial object may have been, who the "Wise Men" were, and where they came from. Written in an investigative journalism style (like that of the Discovery Channel), it targets one star that has never been considered before and builds a solid case for its candidacy.

http://www.amazon.com/dp/B00QFIAC3G

My other titles include:


Copyright © 2015 by Philip Rastocny. All rights reserved.